Wednesday, June 01, 2005

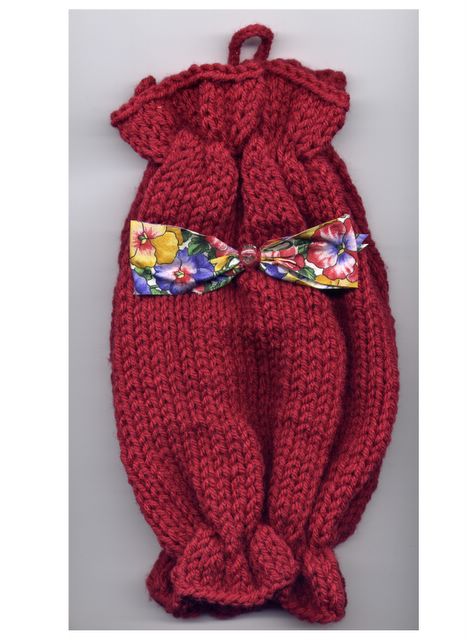
GROCERY BAG DISPENSER


Plastic Bag Dispenser Posted by Hello
Copyright to Judith Prindle 5/30/05

Worsted Weight Yarn
I used Redheart (8 ounce)had a lot left.
Size 10 &1/2 double point needles
Two hair elastics, medium size.
Pretty ribbon, bead or charm of your choice.

Gauge: 4 stitches = 1 inch

Cast on 60 stitches

Join together being careful not to twist.

Knit 5 rounds, or about 1 inch.

This round you will be attaching the hair elastic:
Round 6: Insert the right needle as usual to knit.Loop the hair elastic over right needle, bringingthe yarn over the hair elastic, knit the stitch dropping both the stitch and hair elastic from the needle.Knit the next stitch.This will work the hair elastic into the row securely.
HINT: I held the hair elastic with my right index fingerwhile knitting it into the bag.

Knit until the bag dispenser is the length youwant it. Mine is short so it would fit on the scanner.

Repeat Round 6

Knit 5 more rounds.
Bind off.
I fashioned a bow with pretty ribbon and sewedit fast. You can decorate your bag any way youwant....or not at all.

Saturday, April 09, 2005

Tiny Little Bag


Created by Judith Prindle 4/5/05
Size 5 needles
Soft Baby Yarn
Gauge is not imoprtant but I got
10 stitches & 11 rows = 2 inches
Cast on 10 stitches
Knit even on 52 rows.
Row 53; Knit 2 together, knit 6 stitches, knit 2 together(8 stitches)
Purl 1 row,
Knit 1 row
Purl 1 row
Knit 1 row
Knit 2 more rows. Bind off......
The construction of this bag is like a sandwich baggie.This might help you "see" how it goes together...
Fold the bag over on row 5, bring the other
end up so the decrease row is on top, at the edge you just folded over, leaving the smaller flap free.
Sew the bag together, catching all three layers together at the top. Hide ends...Done!

Monday, March 28, 2005

Scrubbie Pattern


Knit Scrubbie Picture Posted by Hello

Scrubbie Pattern
Copyright 3/15 to Judith Prindle
Size 7 needles
Worsted weight yarn; I used acrylic, the choice is yours, however.
Gauge is not important.
I had a scrubbie about 3&1/2 inches square before
gathering the edge.
Cast on 2 stitches
(If you don't care to have a hanging loop Start with row 1.)
Work I Cord for about 15 rows.
Row 1; Increase in both stitches.(4 stitches)
Row 2; Knit 1, increase 1, knit to end of row. (5 stitches)
Repeat Row 2 until you have 25-30 stitches.
I had 25 before I began to decrease.
Second half:
Row 1; Knit 1, knit 2 together. Repeat to end of row.
Repeat Row 1 of second half until there are 4 stitches.
Last row before I Cord; Knit 2 together twice. (2 stitches)
(If you aren't doing the hanging loop bind off these 2 stitches)
Work about 15 rows of I Cord. End off....
Take about 12 inches of yarn and thread it through the
out side edge of your scrubbie. Pull tight and secure.
Tie the ends of the I Cord together to form a hanging loop.

Wednesday, March 09, 2005

LITTLE FUZZY BAG


Fuzzy Little Bag Picture Posted by Hello

Copyright to Judith Prindle
11/25/03
Material:
Cha Cha or any eyelash yarn Size 7 double point needles
Gauge:
Gauge; Not important but my bag turned out to 3&1/2 x 3&1/2.
Cast on 30 stitches
Working in rounds, knit untill your bag is the length you want.
Bind off using the three needle bind of method.Hide ends.
Turn bag around, pick up 15 stitches along open top of bag.
Knit 7 rows.
Next Row: Knit 1 stitch, knit 2 stitches together, knit 9 stitches, knit 2 stitches together, knit 1 stitch. (13 stiches)
Next Row: Knit across.(13 stitches)
Next Row: Knit 1 stitch, knit 2 together, knit 7 stitches, knit 2 together, knit 1.(11 stitches)
Next Row; Knit 2, knit 2 together, bind off 3, knit 2 together, knit1.(6 stitches)
Next Row: Knit (6 stitches). No, you do not add stitches over the bind off, this is your button hole.
Next row; Knit 1, knit 2 together 2 times, knit 1. (4 stitches)
Next Row: Bind off these 4 stitches.
Hide ends.
Pick up 3 stitches on the side of your bag next to the flap. Work I-cord strp with these 3 stitches until it is the length you want. Mine is 30 inches.
Sew on button of your choice.
NOTE;If you can, sit down to work the strap when you have time to finish it in one sitting. It is difficult to see the right side of your work with this type
of yarn, especially if you aren't used to working with it.